How to Use Bissell Steam Mop Effectively | Without Any Difficulties
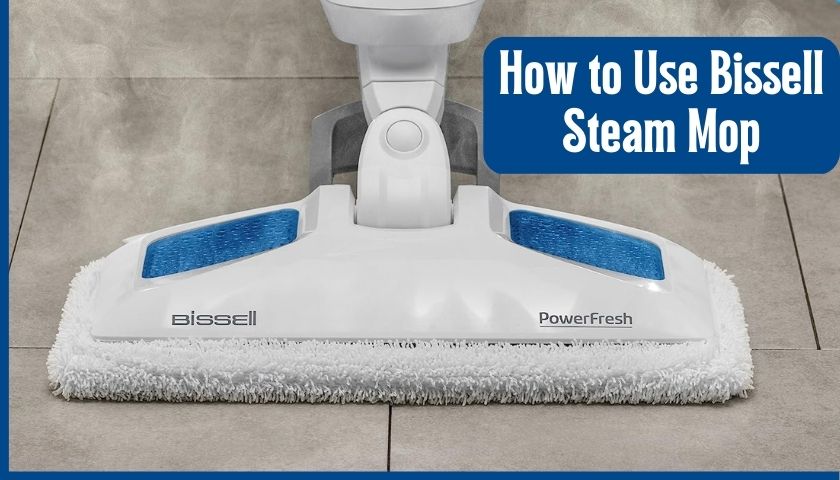
A Bissell steam mop is a super powerful cleaning tool. Proper use of it can be complicated if you ignore or can’t handle its correct usability. So, you should learn how to use the Bissell steam mop before starting work with this.
The primary step to running this steam cleaning tool is to set up the modification button. These three initial set-up modes can be used according to the user’s needs. Before that, the tank attached to this must be filled with water.
However, it doesn’t matter how easy the process sounds; you must know some crucial cases. To inform you of all these, I decided to discuss only the particular steam mop (Power fresh steam mop).
Contents
How to Assemble the Bissell Steam Mop Properly?
When opening the box, you get 4 initial parts, including a plastic handle, 3 different mop sponges, an auto-removable water tank, and a flexible mop head. Before starting the job, you need to assemble this one after another.
- First, attach the mop head with the handle unit. When attaching it, ensure the handle won’t be slid upside down.
- Then, attach the mop head to the pad/sponge altogether.
- Before filling the tank with water, you can give a trial to ensure everything is fitted correctly.
After finishing a trial, you can now start the cleaning job. Below are the general steps to use a Bissell PowerFresh Steam mop.
How to Use Bissell Steam Mop – 9 Steps to Follow
Bissell steam mops usually don’t have any manual on or off buttons. You need to plug it on to connect to the electricity. Then leave the tank to warm the water for 20–30 minutes. So, the cleaning job will start by refilling the tank with water. Herein are the details of all.
Step 1: Fill the Water Tank
Remove the water tank from the mop and fill it with water. You can add a cleaning solution to the tank if desired. Bissell has its own manufactured cleaning solutions, which are safe to use on any floor type. You can choose this too as the cleaning solution.
Step 2: Attach the Mop Pad
Choose the appropriate mop pad for the type of floor you will be cleaning, and attach it to the mop head.
Step 3: Attach the Water Tank
Reattach the water tank to the mop handle and ensure it has been appropriately placed. After this, secure the tank with the mop handle manually. Tight the attaching knots through a screwdriver or other things.
Step 4: Turn on the Mop
Plug the mop into an electrical outlet and turn it on. The mop will begin heating the water and producing steam.
Step 5: Adjust Steam Settings
As soon as it is finished to be warmed up on itself, a little blue light blinks. About a minute later, it’s ready. Pick any settings or steaming power you want, including light, medium, or heavy. Remember that you should choose appropriate settings for the type of floor.
Set the mop in light mode to clean the low-traffic areas to mid-level like bedrooms, kitchen, and others. Floors like bathroom floors, kitchen tiles, and window glasses can also be cleaned with this one.
Moreover, a heavy mode is required on high profile and hard floors like ceramic, laminate, hardwood, etc. So, set it up according to the floor type you’ve.
Step 6: Begin Cleaning
Move the mop back and forth over the floor, using the steam to loosen dirt and grime. You can use the mop pad to scrub tough spots or to wipe up excess water.
During this task, be sure to pressurize the machine sparingly. It may either get damaged or spoil while working. Try to hold and keep the handle as gently as you can. Repeat this process until all the surfaces become clean and tidy.
Step 7: Refill the Water Tank as Needed
When the water tank runs out of water, turn off the mop. Unplug it from the outlet and refill the tank with water. Allow the mop to heat up again before resuming cleaning.
Step 8: Clean the Mop Head
When you’re finished cleaning, remove the mop pad from the mop. Wash it thoroughly according to the manufacturer’s instructions. In this regard, everyone should consult the user manual. It often comes with detailed instructions and safety guidelines.
Step 9: Switch Off and Store
Once you have finished cleaning, switch off the steam mop and unplug it. Remove the mop pad and wash it according to the manufacturer’s instructions. Remove any remaining water from the tank and store the steam mop in a safe, dry place.
7 Mistakes to Avoid While Using Bissell Steam Mop
While using the Bissell steam mop, one should know some everyday things. Maintaining these affairs could help you to use this machine for a long time. Here I add some mistakes that the user generally holds, and the folk needs to be more careful about this.
1. Hesitant to Wait After Plugged In
Be patient whenever you’re plugged into the power supply or electricity socket. It sometimes requires probably 20–30 seconds to heat properly.
Moreover, it also needs some time to warm the tank water used to clean the surface dirt. Therefore, you should give that time to the machine to enjoy better outputs.
2. Vacuum the Floor (Which Needs to Be Cleaned) First
A steam mop can trace and vanish invisible dirt from the floor. This machine is run by electricity and additional suction power, so it cannot collect solid ground. Moreover, solid dirt like pet and human hair, chips, and juice packets can easily stick to the mop head.
For this, you cannot continue to work with that machine since those things will disturb the suction properly. To eliminate this problem, the only solution is to vacuum the floor properly. Vacuuming before steam can help in this regard, and they ensure that all the solid dirt is cleaned.
3. Overheating the Mop
Sometimes you can be distracted while waiting for the steam mop to warm up. You may get sudden phone calls or need to open the door for the abrupt doorbells. If that incident occurs to you, then please unplug the mop and redo the heating process later.
Bissell steam mop takes very little to heat properly-around, 20 seconds. If it remains in one spot for a long time, it will damage the floor-especially, which is very sensitive.
4. Not Cleaning the Dirty Wet Mop
As you know, this steam mop tool comes with three additional microfiber mop pads. You can use them chronologically but don’t leave them behind uncleaned. This is a prevalent and horrible mistake made by everyone.
So, be careful and try to clean it after finishing the task every time. Wash these microfiber pads before you want to use them. Otherwise, it will leave watermarks on the floor.
5. Using Harsh Chemicals as A Cleaning product
This steam mop requires only water to clean the entire floor. Except this, you don’t need any extra products to be applied on. But many people make mistakes by applying harsh chemicals to it, resulting in untold damage to the machine.
6. Conducting Steam Mop on Unsealed Floor
Consider not using this steam mop on the unsealed floor. A Bissell steam mop is suitable for hardwood and laminate floors. But they must be adequately sealed to provide extra protection against uncertain damages.
This steam mop can produce more heat, impacting hardwood floor finishes with polyurethane. Similar things are also applicable to unsealed laminate floors.
7. Using As a Wall Paint Tool
Using this steam mop while washing off the bathroom walls sounds good. But this is recommended by someone other than the expert. Bathroom walls or even the Window’s windshield is very damage-prone.
For this, steaming those wall floors can cause the paint to be scratchy, unpolished, or lifted. You may need to repaint them after that.
Frequently Asked Questions (FAQs)
What Solution Can I Use in Bissell Steam Mop?
You can use only 100% demineralized water in it. This solution effectively cleans the floor entirely without damaging the finish.
What Is the Correct Way to Use a Bissell Steam Mop?
The most common way is to attach the clean mop head or cloth to the steam mop. Turn it on the appropriate settings and ensure refill the water tank with the maximum water required by the manufacturer. Then, plug the steam mop and begin cleaning.
How Much Water Should I Put in A Bissell Steam Shot?
Avoid putting more than 6.6 fl. oz of water in a Bissell steam shot. The tank capacity is required only for that measurement to work out appropriately. Overfilling it with more water may hinder the general work of the steam mop.
Do I Put Hot Water in a Bissell Steam Mop?
When you put hot water in it, the Bissell steam mop works more quickly to loosen and soften the dirt. But this is not recommended for dirty floors. Hot water vapor techniques are worth cleaning the carpet floor. It helps to kill bacteria and other types of germs from the carpet fur.
How Long Does Water Last in Bissell Steam Shot?
It can deliver 45 minutes of steam after heating up properly. Therefore, you don’t need to frequently run to the sink to refill the tank.
Final Wrap
Bissell steam mops are fantastic and take the initiative in sanitizing the floor deeply. Especially the Powerfresh steam mop of Bissell is a perfect disinfecting tool for those with pets and kids at home.
Therefore, learn how to use the Bissell steam mop under my guidance and enjoy the advantages.
I hope you are amazed by the results after the finish of the job. Because this one heats up very quickly and produces abundant steam to track lots of mud and dirt.


![How to Attach a Swiffer Wet Pad? [Learn to Do It Correctly]](https://mopsreview.com/wp-content/uploads/thumbs_dir/How-to-Attach-Swiffer-Wet-Pad-20ohih1eaj9c1n0speeheg51u8ulaobz5p513g7q9y90.jpg)