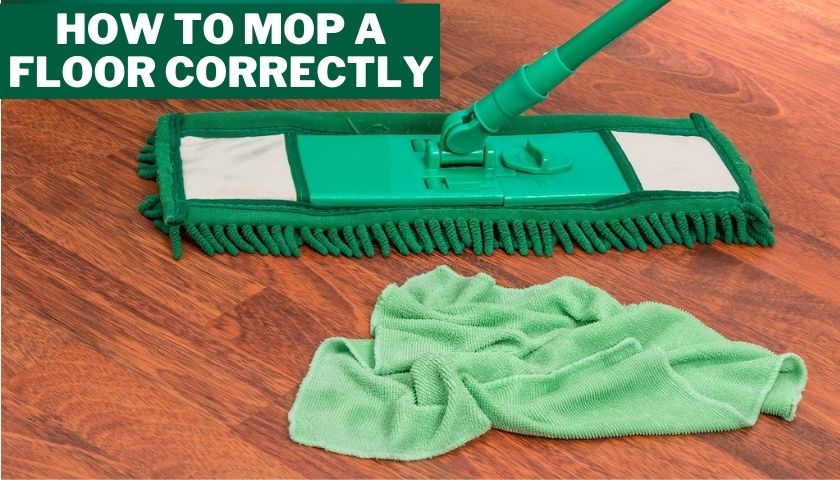
How to Mop a Floor Correctly | 4 Easy & Effective Methods
It is high time to take your dirty floors go away as a correct mopping system will assure you a crystal clear floor.
You have already got the mop to resolve tinny filth or mop up the regular dirt attached with your floor. However, do you want to make your floors unclean by wrong practicing this cleanup tool?
If you are tackling with sloven floor, it doesn’t make any difference how many times you are sweeping your floor. You probably forget the main law of mopping, which tells us to do, vacuum at first hand and mop at the second trial.
In the absence of a good vacuum work, depending on only mopping can bring you wastages. Therefore as a clean-freak, you must choose the right mopping methods for your faultless floor.
Yet, before jumping into the main purpose: how to mop a floor correctly, let’s have a look at the types of floor that required different mopping.
Contents
Types of Floors
Sometimes you will notice after countless mopping, your floor remains dusty all along. Why so? Well, it happens due to the floor types, which need separate mopping tools. As every floor type doesn’t follow the same cleaning method, you should know the particular cleaning method for each floor type. There are enlisted some floor types for your convenience:
- Hardwood: Be aware of your floors as they have Polyurethane or wax. If the floor is fastened with Polyurethane, you will take a ph-neutral soap with water for cleaning. Leave off the common cleaning, particularly the acidic additives that are harmful to wood. When your floor is waxed, you are allowed to use an almost sapless mop to clean up once a week. A light amount of water might distort your wood.
- Laminate: If it comes right down to mop your floor, especially laminate floors, then you are told to do the same process suggested for hardwood. You need to avoid while cleaning the laminate board. Nevertheless, for the laminate floor, you can use vapor cleaning and blemish clearing. Say no to the commercial floor cleaner.
- Vinyl: Apple cider vinegar and water are the best answers for this type of floor cleaning. Talking about vinegar, it steals dirt very quickly, also free from any kind of infection.
- Tile: In the case of tiling floors, use pH-neutral cleaner for stone tile; on the other hand, white vinegar and water is preferred to use on ceramic tile.
How to Mop a Floor Correctly
Mopping your house corners or floors, by all means, will adorn your house; apart from that, it will lock up your health safe and sound. But among you, many of them are unaware of mopping their floor correctly. So brace yourself for our today’s bit on how to mop a floor correctly. Here we will be addressing four methods bit-by-bit for cleaning floors rightly.
Method 1: Set for Mopping
Before you get into mopping, you have to know the basics and necessary cleaning and mopping regulations. Here are a few.
- Wipe once a week
Give appreciation to your kids, four-legged friends, and numberless foot mobiles for which your floors are always dirty; you need to make extra efforts to mop them up each week. In whatever way, lift a finger to mop your hardwood floors almost two a month.
Wipe-out hourly can make a rise to the adhesive floor, which increases dirt and garbage.
- Remove dust from the furniture area
Once you start cleaning, shift tables, chairs, stool, pull carpets, and other analogies from the intended area you are about to clean. There’s no need to uplift large furniture such as cupboards, sofa, bookshelves if you do not block in mopping the underneath Or behind pollen of the furniture.
- Without moving furniture items, start off dusting; thus, filths and debris drop down on the ground; you can now easily clear it out before the mopping section.
- Stay away from pulling furniture as you do with tables and chairs. If you barely want any scratches on the floor.
- Inform your roommate about when you will start up mopping and peculiarly which you are going to mop so that they keep themselves away for a minute. If you have any pets, take them till you are done with the mopping.
- Vacuum the floor before mopping
Maximum cleaners perform a dead-end job by collecting crumbs, hair, and other rigid wastage. But firstly, a whisk and hardwood floor vacuum is necessary to tidy up the floor before mopping. Thick debris might grow scratches on the floor if you lack in removing it before cleaning.
Method 2: Choose a Mop and Cleaner
Mop and cleaning solutions are the vital items of your whole cleaning job. It’s time you should pick the right one.
- Choose a mop
A mop is the one who will be your wholesome partner in this whole cleaning session. It would be best if you chose the mop depending on your floor style.
If your floor is made of ceramic tiles with a bunch of textures, a traditional string mop or spin mop is what you need. For a smooth textured floor, a sponge mop can be your driver.
Anyway, an in-built wringer with mop buckets is very handy for your cleaning job. Also, a bucket with a built-in handle can help you lift the mop bucket from one place to another.
- Choose a cleaner
A cleaner is the ultimate cleaning solution; if it’s on the right side, then you will enjoy a good cleaning time. As we mentioned above, the cleaner can vary from floor to floor.
Make sure you avoid some products that use a phrase like “mop and shine,” as they can be misleading sometimes and create a yellowish tone of the floor.
Method 3: Cleanup with a cloth mop
Apart from all kinds of high-end and advanced mops, you can still count on the cloth mop because thousands of people prefer to use cloth mop over other mops.
- Dampen your mop’s cleaning pad in water
Have a garden-fresh cloth cleaning pad that fixes well with the mop. After that, rines the place off with lukewarm water so that you can dampen it. Unintentionally if you dip the pad, drain it out to dispel residual water. Remember, If you are using up sweeper or corresponding products, pick up pre-dampened cleaning pads as a replacement.
- Fix the pad to your mop handle
Put your mop pad on the floor with the stringy side facing downward. Then press on the edge of your mop handle to the pad’s uncovered parts until the two assimilate to each other. In addition to using swifter WetJets and other equal products, you can join the place by pressing it with the mop handle with your fingers’ help.
- Use a spray that can work as a cleaning solution
Snatch a spray bottle and fill it up with tepid water along with other cleaning essentials, for instance:
soap, bleach, and apple cider vinegar. When the cleaning mixture is ready, you can spray it out throughout your floor.
- Rubbing off the mop along the floor
Make a pressure onto the mop for washing the floor and cleanse it using backward and forward movement of the mop. Keep doing each section several times to straighten out the utmost dirt.
- Change your mop
Products are not meant to last forever and are also the same for the mop pad. You may need to change your mop pad many times while you are cleaning. That’s a drawback of using a mop pad, you can say, but it’s worth the cleaning.
When you see that your mop pad isn’t cleaning correctly and leaving dust and dirt behind, then it’s time to change your mop pad.
Method 4: Finishing procedures
When you have done the cleaning, now you must take care of your mop and mop buckets, which you have used.
- Rinse and dry your cleaning supplies
Whether you used a cleaning cloth mop or string mop, or spin mop, you must have to rinse it with a mixture of hot water and detergent. Instead of detergent, you may count on bleach. That’ll do.
After a thorough rinse, let the mop and mop buckets dry in sunlight or anywhere you prefer.
- Let your mopped floor or area dry
The moment you finish cleaning, step aside from the area or floor you have just mopped. Let the floor dry in the air for at least 30 minutes to 1 hour. If you want a fast dry, open up your door, windows, and ventilators. That’ll fasten up the drying procedure.
Frequently Asked Questions (FAQ)
Do you rinse the floor after mopping?
After finishing the first mopping, you can do the mop again to remove the cleaning solutions’ leftovers. If your mopping area is a big one, then mop along with rinse in small sections.
Why my floors are still dirty after mopping?
In this case, you may have mopped with dirty water or used the same water for a long period. You have to change your water when you see the watercolor is changed. Or else, you will keep mopping dirt with dirt.
Is it better to mop with hot or cold water?
As our research, we can say mostly 70% of our population prefers hot water for cleaning, because it removes bacteria, germs, and all kinds of hard stuff in a sip.
Is vinegar a disinfectant for floors?
Vinegar is famous for hardwood, tiles, and concrete textured surfaces. A vast majority of people use it.
Is it better to vacuum or mop first?
It is obvious to vacuum first, or you won’t enjoy a healthy mopping. Even on the hardwood surfaced floors, you have to vacuum, and it’s pretty easy to vacuum. Afterward, you may start mopping and clean as you prefer.
Wrapping up
You must include floor cleaning in your regular cleaning schedule. The tips and processes we have discussed earlier will assist you in the whole cleaning process with a better result. Mopping your floors will prevent all germs and bacteria from housing and mold as well. So, as you have seen, mopping isn’t that challenging, just a few simples rules to follow and the right cleaning products to have.


![How to Attach a Swiffer Wet Pad? [Learn to Do It Correctly]](https://mopsreview.com/wp-content/uploads/thumbs_dir/How-to-Attach-Swiffer-Wet-Pad-20ohih1eaj9c1n0speeheg51u8ulaobz5p513g7q9y90.jpg)
[…] Read next: How to Mop a Floor Correctly […]
[…] Read next: How to mop a floor perfectly […]
[…] Read next: How to mop a floor correctly […]